![]()
Tutorials
Hints and Tips Page
3
Click on any of the thumbnails
below for a more detailed photo
|
Stabilizing
Wood |
||
|
|
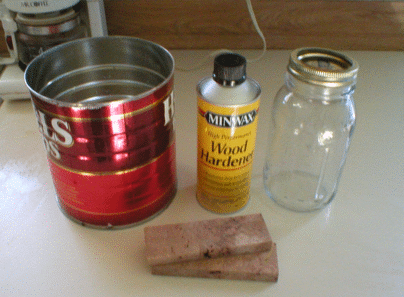
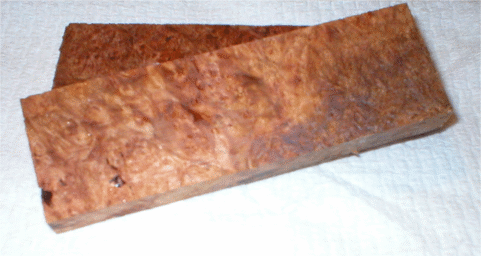
Here's what you need to start: a one pint can of Minwax High Performance Wood Hardener, an airtight jar large enough to hold the scales you're treating , a coffee can large enough to hold the entire jar and a nearby saucepan to keep a constant supply of boiling water at hand. I'm going to do a nice set of maple burl scales here. | |
| Safety note: When I first read about this home process, the writer suggested using a double boiler set up ( The jar sitting in a pan of boiling water) on a hot plate to heat the Minwax Wood Hardener in the jar. I'm not the brightest guy you'll ever meet, but this stuff has ketones in it. Uh...yeah. The fumes from the ketones are so EXTREMELY flammable that I could never bring myself to recommend this particular technique to anyone, no matter how well you think you can sit there and supervise this. IT"S DANGEROUS!!!!. If you really want to do it this way, make sure you do it in the home of someone you really don't like. Use Google to look up "Flash Fires". If you're using anything with ketones in it, try keep it at least seven miles away from any open source of heat. | ||

|
Set the scales inside the jar and cover with wood hardener. Set the lid on loosely and set this inside the coffee can | |
|
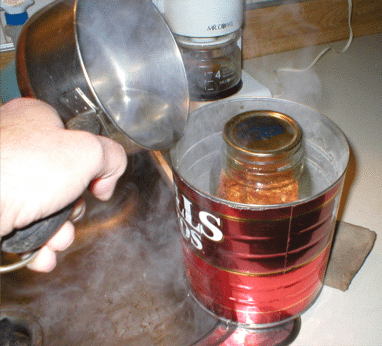
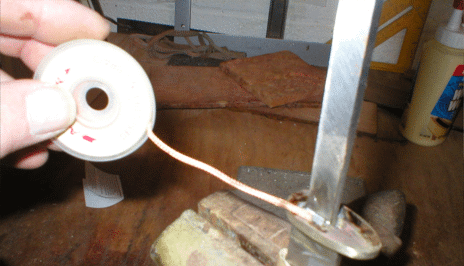
Pour boiling water in the coffee can to surround the jar. The object here is to safely heat the wood hardener in the jar. By the way, please make sure the area is very well ventilated. The smell is very strong enough to strip wallpaper and will assuredly lower your IQ by a few points if inhaled for a long time. Outside is best, by an open window is a second choice. | |
|
Keep replacing the water as it cools off to keep raising the temperature of the wood hardener almost to the point of the boiling water. You are also opening up the pores of the wood. I put a very small hole in the base of the coffee can to allow the hot water to gradually drain as it cools. | |
|
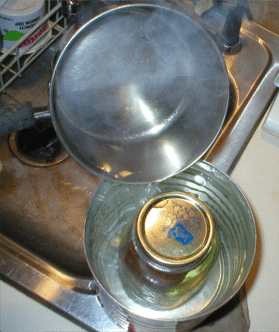
You'll see the wood hardener bubble like
ginger ale as the air is displaced in the wooden slabs. Keep doing this for
about a half hour until the jar and the wood hardener is so hot that you need an oven mitt to
hold it. I didn't say very warm, I said HOT. |
|
|
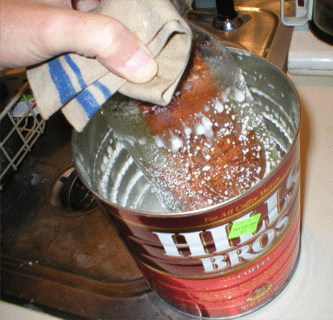
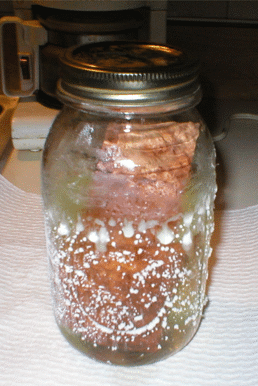
Remove the jar and screw that lid down tightly. Remember your high school physics class? As the closed jar cools off, a vacuum will be created inside which will draw the wood hardener into those newly opened pores. Let it cool off slowly and keep the jar sealed for a week or so. The white stuff on the side of the jar is some of the wood hardener that foamed over the lip. | |
|
Take the scales out and let them cure in open air for a few more days. You can reseal the jar with the wood hardener in it, and store it for future projects. Wow, look at these things! Beautiful!. You'll also notice that since they soaked up so much wood hardener, they are twice as heavy. | |
| Notes: This works great for 3/8" thick scales and the wood hardener soaks all the way through. I haven't tried this process with blocks yet, but I'm going to assume that it's best if you do some preshaping first to get the block close to a final shape before you do this. This also works best with softer woods ( like redwood ) and open pore woods ( just about any burl ). Some heavy and dense woods ( like cocobolo or ironwood ) won't work well, but they really didn't need to be stablized in the first place. | ||
| Note 2: I recently came across a superior product that can be used for wood stabilizing: Cactus Juice by TurnTex . Owner Curtis Seebeck also has some useful tutorials and examples | ||
|
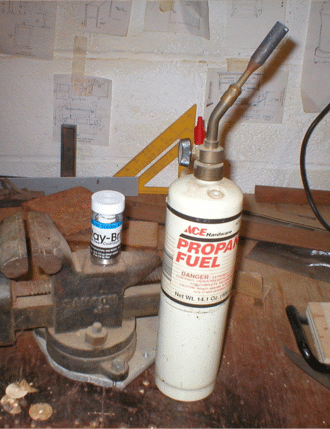
Soldering OK, I've held off on doing this tutorial long enough, mainly since I'm such a poor solderer. It's really not that tough to do. I think a lot of people just have a mental block against it. Soldering is for both strength and looks and makes your creation look extremely professional. I tried a number of hardware store solders and kept getting frustrated. Once you try this Stay Brite stuff you'll never try anything else. It flows at a low 430 degrees but is a lot stronger than regular silver solder. |
||
|
Basic supplies: a propane torch ( you don't need one of those fancy ones), a vice to hold the knife during soldering, ( as if I don't have enough vices), and the star of the show: Stay Brite solder. You're going to find that a good solder like Stay Brite will make your life a whole lot easier. | |
|
Make sure the guard fits tight and snug. Don't plan on using the solder to fill large gaps or you'll end up with a very weak joint. Use a file to get a final fit on the guard slot and a Dremel with fiberglass cutting disk to square up the inside shoulders of the tang. Test fit often The slots on the machined guards are just a hair undersized to allow you to do a final fitting. | |
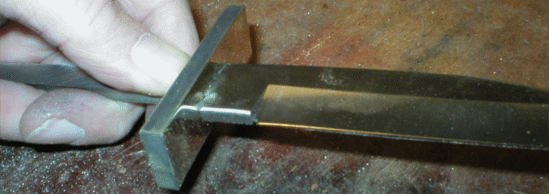
|
Yeah, that's more like it. Good tight fit. Check it from all sides to make sure there are no gaps anywhere. |
|
|
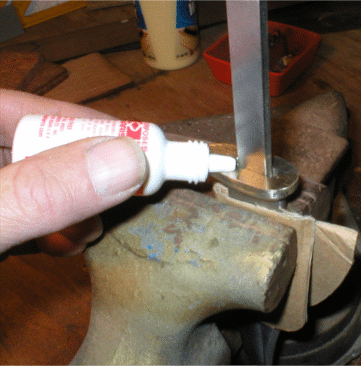
I wrap the blade in cardboard to keep the vice from marring the blade while being clamped. A lot of people like to solder from the front but I like working from the back, hence the downward facing blade. Stay Brite comes with an excellent liquid flux which, when heated, cleans and etches the surface lightly, helping the solder stick all that much better. Apply sparingly. | |
|
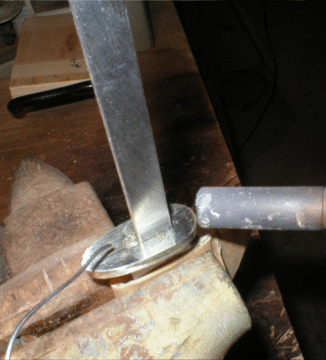
Heat up the guard for a few seconds until it's hot enough to melt the solder. A common mistake is thinking that the torch is used to melt the solder. The guard should be hot enough that the solder turns into a liquid and flows into those tiny gaps. If the solder beads up, the guard isn't hot enough and it'll just sit in a bead on the top. | |
|
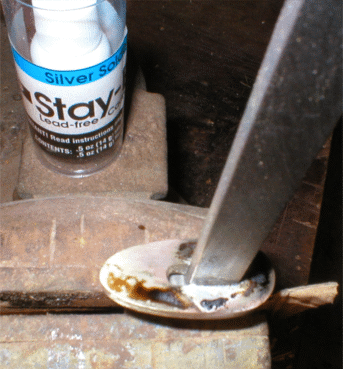
A few seconds later. Kind of anticlimactic. Admire your work but don't touch for a few minutes before attempting to pick it up. Inspect it to make sure you haven't missed any spots. | |
|
If you have any overly large blobs of solder, you can use a braided solder wick ( available at Radio Shack or any electronics store) . Heat up the solder with the torch and this stuff will soak up the melted solder like a rag soaking up water. | |
|
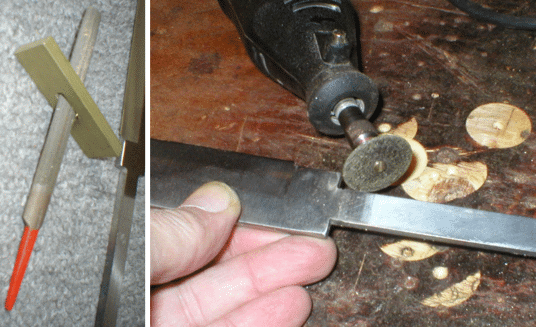
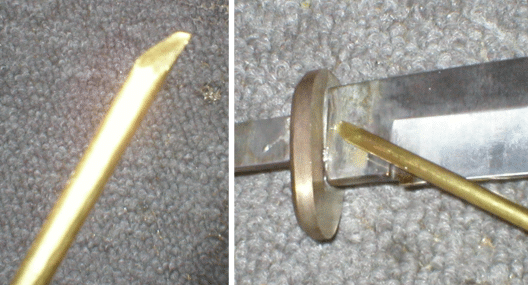
Find a scrap piece of brass rod and grinf a chisel tip on it as shown. Use this to gently scrape the solder down flush to the surface od the blade and guard. Go slow. The brass is harder that the solder and softer than the blade but could still scratch you guard. | |

|
Use some fine ( 240 followed by 400 and 600) grit wet or dry sandpaper to do any final touchups . Take your time and do a nice job here. A lot of times another knifemaker will inspect your joints first . A nice job here just sets the tone for the quality of the whole project. | |

|
OK, now we're ready to start planning what kind of handle we're going to do. That'll be another lesson. | |
Hints and Tips Page [1] [2]
[3] [4]
[5] [6]
[7] [8]
[9] [10]
[11] [12]
[13] [14]
[15] [16]
[17]
Next
Got a good tip that you think your fellow knifemakers would like to know about?
Drop me a note at pjp2@northcoastknives.com