![]()
Tutorials
Progression Tempered
Puukkos:

|
|
|
| With the introduction of the revolutionary Progression Tempered Puukko blade, an excellent blade gets even better. The spine is tempered to a utilitarian Rockwell hardness of RC52, while the edge is tempered to an incredible RC63. You get a blade that will hold an edge almost forever while not being fragile and brittle. You'll get a lot of use from these things and you don't have to worry about babying them. With this project, I'm going to show you the two types of traditional construction: guard and ferrule. Read the first Puukko Tutorial before you begin because I'm going to skip a few steps here that are covered in that particular step by step project. | |

|
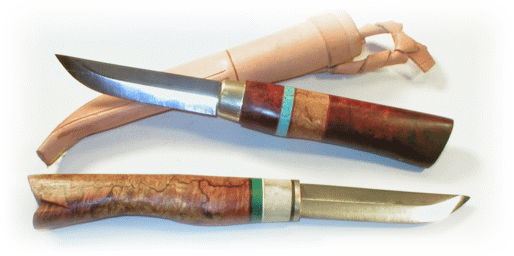
Let's start off with the guard type of construction. The parts: the Progression Tempered blade, a piece of reindeer horn spacer, some black and white fiber spacers, the stamped brass guard and a piece of decorative stabilized Jade. The block of wood for the handle is Maple Burl |

|
This is about the tenth Puukko I've made and I decided to make a jig to hold the parts securely while the epoxy cures. I used to rely on gravity to hold the parts but the last two knives set up crooked and presented a problem in fixing. The jig is two pieces of 1" x 2" stock with 1/4" dowel guides, shaped as shown |

|
See the Puukko Tutorial to see how to drill the block and shape the spacers to get to this stage. The jig uses the pressure from a couple of rubber bands to clamp all of the pieces securely together while the epoxy cures. |

|
After the epoxy cures, I use a band saw to cut the handle to approximate shape and a belt sander to do the final rounded finishing. |

|
I decided to give this particular knife handle a slightly more organic or natural shape and used a Dremel Mototool with a 1/4" rotary bit to shape the "fishtail". |

|
After a few coats of penetrating finish and a slight polish, you're done. Opinion is split on the handle shape. I really like it and find it attractive, but some folks ( like my two sons) don't find it "macho" enough. You'll have to form your own opinion |

|
A variation of the guard method of construction is making a Puukko with a ferrule . I actually think this gives you a stronger blade and handle. Parts are similar to the project above but I'm using a walnut burl with maple burl spacer and a piece of stabilized turquoise for decoration. |

|
This is a picture of the handle block lamination showing the walnut burl/maple burl/turquoise/ fiber spacer glue-up. The second picture shows the process of cutting the shoulders at the front of the handle that the ferrule will fit against. Use any straight, fine tooth saw. |

|
The final shaping of the shoulder that the ferrule will fit over will have to be done with a utility knife. Carve carefully around the hole drilled for the knife tang and test fit often. |

|
The inside slot of the ferrule will have to fitted to the blade also. Use a fine file. The inside shoulders of the blade are rounded also and I square these off with a fiberglass disk in a Dremel mototool. |

|
Use a good, slow set epoxy to glue the whole assembly together. The toothpick is to plug the previously drilled weep hole which allows trapped air to escape and prevents air bubbles and voids in the epoxy. When cured, I shape the handle with a coping saw. |

|
I used a belt sander for most of the final shaping, but nothing beats a hand sanded finish. Use progressively finer grades, ending up with about a 400 grade of sandpaper. Be careful sanding down the shoulders around the ferrule. |

|
I use several coats of a penetrating oil finish as a final step . Looks great, doesn't it? To purchase the Progression Tempered Puuko, please visit the Finnish Knife page. |