![]()
Tutorials
Camping Puukko:

click on any picture
below for an expanded view
|
|
|
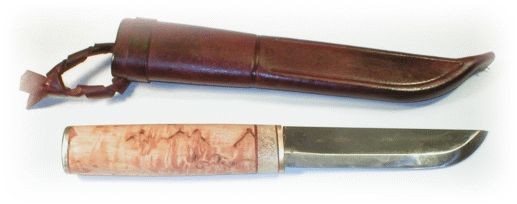
| I have long admired the simplicity, elegance and utility of many of the Japanese blades, but this has been replaced recently with my awe and wonder at the design and function of the knives from Finland. Designed for work, these knives are pure and simple in design with little in the way of decorative ornamentation that doesn't contribute to it's usefulness. The beauty of this knife is in it's rugged function and simple good looks. | |

|
Here's what comes with the kit: the 5 1/2" blade, a traditional leather sheath, a block of curly birch wood for the handle ( again, this seems to be traditional), a section of horn spaces, a brass guard and butt cap, and two pieces of red fiber spacer. Pretty inclusive. |

|
First step is to drill the birch block to fit the knife tang. You can see I marked the tang profile on the block drill but since this model is going to have a butt cap, I'm not going to worry too much about stopping the drill before it goes all the way through. Drill a 1/6" weep hole also, to help air escape when the handle is filled with epoxy. |

|
Trace the outline of the guard on the horn spacer and use this as a pattern to cut a hole for the knife tang. I used a small carbide bit in a Dremel tool to gut this. The brass guard could stand to be cleaned up a bit, too, I polish it on a worn belt on the belt sander. Easier to do it now than after it's mounted. |

|
The tang hole in the brass guard was too tight, so I use a diamond nail file ( any small file would do) to enlarge the opening. Check the fit often until the guard fits snugly over the tang. The inside shoulders of the knife blade were slightly rounded, also preventing a good, tight fit against the guard. I use a fiberglass cutting disk in a Dremel to square this up. Again, check the fit often. |

|
Test fit all parts before starting to epoxy them together. Notice how I used a utility knife to cut holes for clearance of the tang in the fiber spacers. Mix a good slow setting ( 3 hours ) epoxy and fill the tang hole . You did remember to put a piece of tape over the hole in the opposite end, didn't you? |

|
Spread a thin layer of epoxy between the horn, guard and fiber spacers before slipping them on the blade. Rubber bands hold it together tightly while the epoxy cures. Toothpick is to plug the weep hole after inserting tang into epoxy filled handle. Yes, it's messy and you're going to get epoxy all over everything. |

|
Hmmm. The hole I drilled for the tang was pretty off center. Oh well, we'll fix that in a minute. Draw a reference line straight back from the blade and trace the profile you're going to cut. Don't worry about keeping the reference line straight on the block, concentrate on keeping it straight to the blade. |

|
Cut the top and side profiles on a bandsaw or jigsaw, or use a coping saw. I cut a cardboard template and used it to trace the outline I wanted to cut. This way I could try several profiles before committing to cutting |

|
I traced the butt cap on the base of the knife and used this as a guide when sanding the handle to a rounded cross section. I used a backsaw to cut the shoulders on the base against which the butt cap will be epoxied. |

|
Use a utility knife to whittle away the shoulder for the butt cap, checking fit often. I "roughed up" the inside of the butt cap with a sharp carbide bit to give the epoxy something to bite onto. Put a few drops of epoxy on the inside and set it aside to cure. Use sandpaper to fine tune it after the epoxy has cured. |

|
I used a colonial maple stain to darken the curly birch handle slightly and to make to burl pattern really pop out. |

|
Well, I guess the purpose of these tutorials is to learn from my mistakes. I got some vegetable oil from potato chips on the bare leather of the sheath, and this caused uneven penetration of the dye, giving it an ugly, splotchy look. I ended up using a spray penetrating oil finish from Minwax to give it an even sheen. |

|
Done. A rugged and durable knife that's just begging to go to work. |
To view the Camping Puukko Kit and other fine Finish blades, please click HERE